Everybody want some private files needs to be saved from others.
To keep that privacy we do lot of things.
here is one of them.
just copy this code:
%%%%%%
cls
@ECHO OFF
title Folder Locker
if EXIST "Control Panel.{21EC2020-3AEA-1069-A2DD-08002B30309D}" goto UNLOCK
if NOT EXIST Locker goto MDLOCKER
:CONFIRM
echo Are you sure u want to Lock the folder(Y/N)
set/p "cho=>"
if %cho%==Y goto LOCK
if %cho%==y goto LOCK
if %cho%==n goto END
if %cho%==N goto END
echo Invalid choice.
goto CONFIRM
:LOCK
ren Locker "Control Panel.{21EC2020-3AEA-1069-A2DD-08002B30309D}"
attrib +h +s "Control Panel.{21EC2020-3AEA-1069-A2DD-08002B30309D}"
echo Folder locked
goto End
:UNLOCK
echo Enter password to Unlock folder
set/p "pass=>"
if NOT %pass%== type your password here goto FAIL
attrib -h -s "Control Panel.{21EC2020-3AEA-1069-A2DD-08002B30309D}"
ren "Control Panel.{21EC2020-3AEA-1069-A2DD-08002B30309D}" Locker
echo Folder Unlocked successfully
goto End
:FAIL
echo Invalid password
goto end
:MDLOCKER
md Locker
echo Locker created successfully
goto End
:End
%%%%%%
here are the steps:
1). First open the notepad and copy this code.
2). Save this file as locker.bat and save it in your hard disk.
3). when you double click that .bat file it will create one folder
with the name of "locker". paste your confidential files in that folder.
4). To hide this folder just double click that locker.bst file again.
5). In that cmd prompt just press y and press "enter". the folder will be hidden.
6). TO open the folder again double click the .bat file.
7). by modifying that .bat file you can set the password also.
please leave your comment after you checked out
Jun 25, 2009
hidden files...? don't worry
hi to all,
sorry friends...
i took too much of time to update this blog
This is interesting and important also..
many of us may have stored data's in our pen drive or
in our system. but due to virus attack the important data
files may be changed to hidden files...
that time what to do..
dont worry here is the simple solution with this software...
the simple software (Hide File Scanner) which has the name
will do the remaining things...
please go to this link if you need...
http://www.delphifreeware.com/downloads/hfs.exe
i am awaiting for your feed back...
May 16, 2009
How to change the boot sequence in the BIOS
Are you Looking to change the boot order for your Windows XP or Vista machine? By changing the boot order, you can force your computer to boot from a CD/DVD drive, a floppy drive, or even off the network.
Changing the boot order on a PC is mostly done in order to boot from a recovery disk or from an OEM disk to run some kind of Windows repair software, such as the Recovery Console.
So here are the steps to change the boot sequence for a PC:
1: The first thing you have to do is restart your computer and enter the BIOS. You can enter the BIOS when you see a message such as “Press FX to enter setup” or something similar.
On a Dell machine it’s usually F2, Toshiba is F1 or ESC, HP is F1 or F2, and IBMs usually require you to go to Start, Programs and then Thinkpad CFG to start up in the BIOS.
2: Now that you are in the BIOS, the tough part is finding the boot order section. Note that there are not a ton of options in a BIOS, so just go through every page if you have to until you see something like First Boot Device, Boot Order, Boot Management, Boot Sequence, etc.
change boot order
It may also be under Advanced BIOS Features or Advanced Boot Options.it’s under Advanced BIOS Features. Use the arrow keys to navigate.
change boot sequence
As you can see, there is a First, Second and Third Boot Device. Scroll down and use the arrow keys to change the device to HDD (hard drive), Floppy, CDROM, or Network.
change boot order sequence
The instructions for changing the boot order are in the sidebar, but usually it requires pressing the + or – buttons to move items up and down in the order list. The first item in the list is what will be scanned first when booting. If boot media is not found, it will try the second device and so on.
Finally, go to Exit and make sure you choose Yes to the Save configuration changes and exit now? question.
bios boot order
That’s pretty much it! If you have any questions or can’t get into the BIOS on your computer.
Dec 30, 2008
Mount NTFS / FAT32 Windows Drive In Ubuntu
Recently I got my ubuntu Cd’s shipped to my home place, I was so curious to try ubuntu desktop edition which can be easily installed and configured with dual boot on my hp tx1000 laptop which had vista previously installed. After installation Ubuntu easily integrated and add a new entry with in the vista bootloader.
But the most disappointing thing I noticed in ubuntu is that I was not able to access the songs and other files which were there in the windows drive from ubuntu.
So, if you are facing the same problem don’t worry as I have the solution for you, Lets see how I solved the problem and mounted the windows ntfs and fat32 drive in ubuntu.
1. Open terminal in ubuntu
2. Type the following command
sudo /bin/bash
Note: Now type the password of the root user in ubuntu
3. Now, type the following command
mkdir /media/windisk
4. Now, you need to force mount the ntfs drive of
windows by typing the following command
For Mounting NTFS Drive, type the following command
mount -t ntfs-3g /dev/sda1 /media/windisk -o force
For Mounting FAT32 Drive, type the following command
mount -t vfat -o umask=000 /dev/sda1 /media/disk
You can change the parameter in the above command
/dev/sda1 to change the windows drive to mount,
In order to get the listing of the windows drives
type the following command
fdisk -l
5. Now, to access all the windows files browse to
computer and open file system
Open Filesystem, browse to media/windisk to see all
the contents of the drive you mounted.
Note: Make sure to close the terminal after you are
done with mounting your windows partitions as the
terminal is running as super user so may accidently
run some commands which may harm you.
Dec 16, 2008
How to Disable Autoplay of Audio CDs and USB Drives
I find it very annoying when I go home from work and
plug my laptop into my external hard drive… The autoplay
window always pops up and asks me what I want to do with
the files, which may be fine the first time, but
definitely isn't after a year of that.
To get to the configuration screen for this setting,
go to Start Menu \ Run and type in:
gpedit.msc
You will see the Group Policy window.
You should select Administrative Templates \ System in the tree view:
You will see an item in the right side pane called "Turn off Autoplay"
Double click the item, and set the radio button to Enabled,
and change the "Turn off Autoplay on" to All Drives.
Now you should be safe from the autoplay monster.
Nov 29, 2008
How to prevent your PEN drive from VIRUS
1. Connect your Pen Drive or USB drive to your computer.
2. Now a dialogue window will popup asking you to choose
among the options as Don’t choose any of them , Just
simply click Cancel.
3. Now go to Start–> Run and type cmd to open the Command
Prompt window .
4. Now go to My Computer and Check the Drive letter of your
USB drive or Pen Drive. ( E.g. If it is written Kingston (I:),
then I: will be the drive letter .)
5. In the Command Window(cmd),type the drive letter: and Hit Enter .
6. Now type dir/w/o/a/p and Hit Enter
7. You will get a list of files . In the list , search if
anyone of the following do exist
1. Autorun.inf
2. New Folder.exe
3. Bha.vbs
4. Iexplore.vbs
5. Info.exe
6. New_Folder.exe
7. Ravmon.exe
8. RVHost.exe or any other files with .exe Extension .
8. If you find any one of the files above , Run the command attrib -h -r -s -a *.* and Hit Enter.
9. Now Delete each File using the following Command del filename ( E.g del autorun.inf ) .
10. That’s it . Now just scan your USB drive with the anti virus you have to ensure that you made
your Pen Drive free of Virus .
Nov 28, 2008
windows XP installation
Windows Xp installation
Hi to all,
Now a days we are using the well known operating system ‘windows XP’.
But some people don’t know how to install the operating system. Let me explain the step-by-step procedure of installation of XP os.
Requirements:
1. Pentium 4
2. 516 MB RAM
3. 40 GB Hard Disk (minimum).
4. CD/DVD Drive
5. XP CD.
6. Drivers CD (drivers will vary depends upon your computer’s company product like dell, ibm, wipro, hcl…..). Sometimes the vendors will give you the drivers CD when you purchase the pc.
Installation:
1. After switched on the pc, insert the XP OS CD into the CD drive.
2. First go to the bios settings by pressing f8 or f10, it varies depends on pc’s.
First change the booting sequence. Change it to CD booting as first. Then press F12
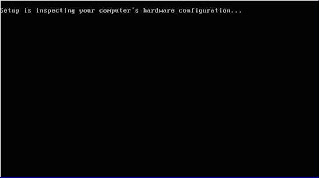
3. After your system is booting…
Press any key to continue in Cd/DVD...
After you see this message press an key...
In the block screen it will show like this
“Setup is inspecting your hardware configuration “


Hi to all,
Now a days we are using the well known operating system ‘windows XP’.
But some people don’t know how to install the operating system. Let me explain the step-by-step procedure of installation of XP os.
Requirements:
1. Pentium 4
2. 516 MB RAM
3. 40 GB Hard Disk (minimum).
4. CD/DVD Drive
5. XP CD.
6. Drivers CD (drivers will vary depends upon your computer’s company product like dell, ibm, wipro, hcl…..). Sometimes the vendors will give you the drivers CD when you purchase the pc.
Installation:
1. After switched on the pc, insert the XP OS CD into the CD drive.
2. First go to the bios settings by pressing f8 or f10, it varies depends on pc’s.
First change the booting sequence. Change it to CD booting as first. Then press F12
3. After your system is booting…
Press any key to continue in Cd/DVD...
After you see this message press an key...
In the block screen it will show like this
“Setup is inspecting your hardware configuration “


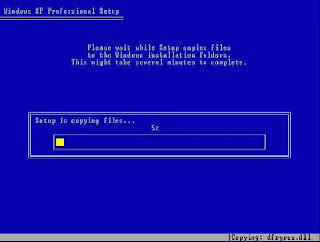
After that your monitor will be full blue and ask you to press F6.
dont do anything. Just watch. The monitor will be like
the below picture.
the below picture.

Here it asks for three kinds of installation options.
1. To install the OS newly, press ENTER.
2. To repair the windows OS press R. you have to select this option whenever your OS is corrupted. If you select the first option,the old datas will be erased.
3. To exit from the installation press ESC.
New installation/Repair.
1. To install the OS newly, press ENTER.
2. To repair the windows OS press R. you have to select this option whenever your OS is corrupted. If you select the first option,the old datas will be erased.
3. To exit from the installation press ESC.
New installation/Repair.

Here it asks for your permission to install the OS. Just press F8

 Here it asks the selected partitioned drive to be formatted.
  Here setup files will be copied from the CD to system.
 Finally your monitor will display like this…
 It will install the required packages automatically. During the
  Select customize. It has three tabs and select language tab.
 Here it contains two checkboxes. If you want to read the tamil Unicode
Select the first checkbox.
 Select OK.
 Settings like the above display Select the and click apply and press OK.
 Now it takes some time to install.
 Here mention your name and mention the company name.
 It asks windows XP key. Mention the key.
 Once the key is verified, you have to give the username. You can set
  Here there are two kinds of network settings. Typical and custom
  Once you select the internet protocol, then click “properties’.
 Here you are going to assign the IP Address for your PC. Mention
 Now it asks for the workgroup name. if you are in college or office
 Now the installation process is processed. Finally the Windows XP
  Press OK.
 Here too press OK.
 Finally the window will display like this. Hereafter still you have to
  Here you should be very careful. If your OS is original you can
 Finally this is the last process. Once you click the finish the

The above picture displays the available unused memory space.
Select the unused memory space. Here you can split the memory
into number of drives as per your wish.
 Here it asks the selected partitioned drive to be formatted.
 That means the data within the drive will be erased. There
are two types of partition types NTFS and FAT. For windows
select always NTFS partition.
 Here setup files will be copied from the CD to system.
 Finally your monitor will display like this…
 It will install the required packages automatically. During the
 regional settings you have to answer some questions.
 Select customize. It has three tabs and select language tab.
 Here it contains two checkboxes. If you want to read the tamil Unicode
Select the first checkbox.
 Select OK.
  Settings like the above display Select the and click apply and press OK.
 Now it takes some time to install.
 Here mention your name and mention the company name.
 It asks windows XP key. Mention the key.
 Once the key is verified, you have to give the username. You can set
 the password by here itself or you can leave it as a blank. After that
you have to set the network settings.
 Here there are two kinds of network settings. Typical and custom
 settings. Select the custom settings, and select the last one(Internet
Protocol TCP/IP).
 Once you select the internet protocol, then click “properties’.
 Here you are going to assign the IP Address for your PC. Mention
the address, and subnet mask properly.
 Now it asks for the workgroup name. if you are in college or office
ask your administrator and mention the name. for home PC’s need
not worry about this.
 Now the installation process is processed. Finally the Windows XP
 OS is being installed.
 Press OK.
 Here too press OK.
 Finally the window will display like this. Hereafter still you have to
 finish some of the settings like time etc. so wait for some time. It will
automatically get into the next process settings.
 Here you should be very careful. If your OS is original you can
register. Now nobody is willing to purchase the original one even
me too. So don’t register. For registration there is a need of internet
connection.

Now don’t register. Select”no, not at this time”.
 Finally this is the last process. Once you click the finish the
 installation process had been over. Now you can enter into the
windows OS environment. Congratulations.

Nov 12, 2008

Subscribe to:
Comments (Atom)